How to Configure Flashback Database?
1. Before to configure Flashback Database, you must ensure that:
2. Consider the value for flashback database window.
It can be set by an initialization parameter: DB_FLASHBACK_RETENTION_TARGET. The range of SCNs for which there is currently enough flashback log data to support the FLASHBACK DATABASE command is called the Flashback Database Window.
The flashback window depends of the current environment requirement but usually it can be between 24 and 72 hours. Don’t consider too big values for flashback window because if you need to perform flashback database operation to a point in time older than several days it can be slower and much more time-consuming operation than using of media recovery method.
Flashback Database is efficient and fast for smaller time spans when the error is immediately (or within few hours) discovered and performing of a Database Point-in-Time Recovery is the only one way to recover from this human error.
Default value for DB_FLASHBACK_RETENTION_TARGET is 1440. It is measured in minutes, so by default flashback window is 24 hours.
Keep in mind that flashback logs use additional space within the FRA. For more info about sizing of FRA to include Flashback Logs, see:
Oracle Database Backup and Recovery Basics - 10g Release 2 (10.2) - Chapter 5.3 Setup and Maintenance for Oracle Flashback Database - Sizing the Flash Recovery Area to Include Flashback Logs
3. Connect as user SYS with SYSDBA privileges.
4. Configure DB_FLASHBACK_RETENTION_TARGET:
SQL> ALTER SYSTEM SET DB_FLASHBACK_RETENTION_TARGET=1440 SCOPE=BOTH;
5. Shut down the database:
SQL> SHUTDOWN IMMEDIATE
6. Start the database in MOUNT stage.
To enable Flashback Database feature, your database must be in MOUNT mode.
SQL> STARTUP MOUNT
For RAC environments, use:
SQL> STARTUP MOUNT EXCLUSIVE
7. Enable Flashback Database Feature:
SQL> ALTER DATABASE FLASHBACK ON;
8. Check whether the Flashback Database feature is enabled or not:
SQL> SELECT flashback_on FROM V$DATABASE;
9. Open the database with enabled Flashback Database feature:
SQL> ALTER DATABASE OPEN;
Configuration with Enterprise Manager:
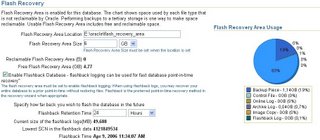
The Flashback Database Feature can be enabled via Enterprise Manager as well.
Go to: Maintenance Tab -> Backup/Recovery Settings -> Recovery Settings
Excluding Tablespaces from Flashback Logging
By default, flashback logs are generated for all permanent tablespaces. If you want, you can disable flashback logging for specific tablespaces.
For example, if you want disable flashback generation for specific tablespace you can use the following command:
SQL> ALTER TABLESPACE USERS FLASHBACK OFF;
If you want to re-enable flashback logging for this tablespace, you can do it only in MOUNT stage.
SQL> SHUTDOWN IMMEDIATE
SQL> STARTUP MOUNT
SQL> ALTER TABLESPACE USERS FLASHBACK ON;
SQL> ALTER DATABASE OPEN;
During a Flashback Operation you must use more actions to handle with missing flashback data for these tablespaces. For more info, see section: Dealing with Excluded Tablespaces During Flashback Operations.
Thanks.
1. Before to configure Flashback Database, you must ensure that:
- Your database is running in ARCHIVELOG mode
- FRA (Flash Recovery Area) is configured
- FRA is configured by two parameters:
- DB_RECOVERY_FILE_DEST
- DB_RECOVERY_FILE_DEST_SIZE
- COMPATIBILITY initialization parameter is set to 10.0 or higher value
2. Consider the value for flashback database window.
It can be set by an initialization parameter: DB_FLASHBACK_RETENTION_TARGET. The range of SCNs for which there is currently enough flashback log data to support the FLASHBACK DATABASE command is called the Flashback Database Window.
The flashback window depends of the current environment requirement but usually it can be between 24 and 72 hours. Don’t consider too big values for flashback window because if you need to perform flashback database operation to a point in time older than several days it can be slower and much more time-consuming operation than using of media recovery method.
Flashback Database is efficient and fast for smaller time spans when the error is immediately (or within few hours) discovered and performing of a Database Point-in-Time Recovery is the only one way to recover from this human error.
Default value for DB_FLASHBACK_RETENTION_TARGET is 1440. It is measured in minutes, so by default flashback window is 24 hours.
Keep in mind that flashback logs use additional space within the FRA. For more info about sizing of FRA to include Flashback Logs, see:
Oracle Database Backup and Recovery Basics - 10g Release 2 (10.2) - Chapter 5.3 Setup and Maintenance for Oracle Flashback Database - Sizing the Flash Recovery Area to Include Flashback Logs
3. Connect as user SYS with SYSDBA privileges.
4. Configure DB_FLASHBACK_RETENTION_TARGET:
SQL> ALTER SYSTEM SET DB_FLASHBACK_RETENTION_TARGET=1440 SCOPE=BOTH;
5. Shut down the database:
SQL> SHUTDOWN IMMEDIATE
6. Start the database in MOUNT stage.
To enable Flashback Database feature, your database must be in MOUNT mode.
SQL> STARTUP MOUNT
For RAC environments, use:
SQL> STARTUP MOUNT EXCLUSIVE
7. Enable Flashback Database Feature:
SQL> ALTER DATABASE FLASHBACK ON;
8. Check whether the Flashback Database feature is enabled or not:
SQL> SELECT flashback_on FROM V$DATABASE;
9. Open the database with enabled Flashback Database feature:
SQL> ALTER DATABASE OPEN;
Configuration with Enterprise Manager:
The Flashback Database Feature can be enabled via Enterprise Manager as well.
Go to: Maintenance Tab -> Backup/Recovery Settings -> Recovery Settings

Excluding Tablespaces from Flashback Logging
By default, flashback logs are generated for all permanent tablespaces. If you want, you can disable flashback logging for specific tablespaces.
For example, if you want disable flashback generation for specific tablespace you can use the following command:
SQL> ALTER TABLESPACE USERS FLASHBACK OFF;
If you want to re-enable flashback logging for this tablespace, you can do it only in MOUNT stage.
SQL> SHUTDOWN IMMEDIATE
SQL> STARTUP MOUNT
SQL> ALTER TABLESPACE USERS FLASHBACK ON;
SQL> ALTER DATABASE OPEN;
During a Flashback Operation you must use more actions to handle with missing flashback data for these tablespaces. For more info, see section: Dealing with Excluded Tablespaces During Flashback Operations.
Thanks.
No comments:
Post a Comment